To get the best lather from shaving soap, load your brush heavily, add water slowly, aim for a dense yogurt-like texture, and apply with purpose. The right tools and technique will protect your skin and deliver the closest, most comfortable shave possible.
TL;DR if you’re in a rush:
-
Tools You’ll Need: Synthetic brush, quality shaving soap, water, and patience.
-
Start Wet: Soak your brush thoroughly before loading. Synthetics need less soak time.
-
Load Heavily: Don’t skimp on soap. Aim for a thick, paste-like coating on the brush.
-
Add Water Slowly: Drip water into the lather in stages, building gloss and slickness.
-
Gloss Is the Goal: Look for a shiny, dense, yogurt-like texture; it protects and lubricates.
-
Rehydrate Between Passes: If the lather dries out, just add more water and keep going.
If you want the full breakdown, keep reading.
Why Artisan Shaving Soap Is Worth the Ritual
Most mass-market creams are loaded with synthetic detergents and drying alcohols.
Artisan shaving soaps use actual soap, not foam-grade surfactants. That means real fats, real humectants, and sometimes even ingredients you would recognize from your kitchen. The result is denser, richer, and significantly more skin-compatible.
Density Means Protection
Artisan soaps are designed to create a thick, low-aeration lather. Not big bubbles. Not foam. A proper lather from a good artisan base feels almost like yogurt. It sticks where you put it, supports the hair with its structure, and creates real cushion between blade and skin. The brush lifts the hair, the lather holds it there, and the razor glides without tugging.
Fragrance That Actually Matters
You will not find “ocean breeze” or “sports clean” here. Artisan soap fragrance is personal. It is built to evolve with the shave. Scent is part of the ritual. Part of the experience. Part of the reason you will look forward to shaving instead of just tolerating it.
Foam Is for Lattes
Shaving lather should not look like dessert topping. The more air you whip into it, the less slick it gets. Big, airy foam means poor glide, poor cushion, and more irritation. The ideal lather is thick, hydrated, and shiny. If you tip your brush and it drips, it is too wet. If it stands up in peaks, it is too dry. The sweet spot is somewhere in between, and when you hit it, you will know.
What You’ll Need to Lather Properly
You will need a few extra tools to get the results you want. Nothing complicated. Just the right setup to let the soap do what it was designed to do.
Artisan Shaving Soap
Look for a poured soap in a tub or a puck you can press into a bowl. This is not the same thing as bath soap or canned foam. You want a formula designed for cushion, slickness, and skin conditioning during a wet shave.

Shaving Brush
You have three main types.
-
Boar brushes are stiff, relatively cheap and need a bit of time to break in.
-
Badger brushes are softer and hold more water but are significantly more expensive.
-
Synthetics are consistent, dry fast, and do not need soaking.
Of all three, I use synthetic the vast majority of the time. They work well from the get-go and don’t break the bank.
Grab The Synthetic Brush I Use 👉Synthetic Shaving Brush
Bowl or Palm
You can build lather in a bowl, directly on your face, or in your palm. Bowls give more control over water ratio and texture. Face or body lathering saves time and lets you feel the lather as it forms. Neither is wrong. Just different tools for different jobs.
Warm Water And A Towel
You need hot water to soak the brush and hydrate your skin. You need a towel to dry off when you are done. Simple but essential.
Optional Tools That Help
These additions might help make the process smoother, but they are not generally essential.
-
Textured lather bowl: Some bowls come with ridges or spirals inside to help whip the lather faster and better. Handy but not mandatory.
-
Spoon or scoop: Keeps the soap dry and clean between uses. Also makes it easier to portion hard soaps or smaller tubs without gouging with the brush.
-
Distilled water: If your tap water is hard or chlorinated, it will wreck your lather. Distilled water eliminates the variable. It gives you consistent results and is especially helpful when testing a new soap.
That said, many soapmakers, us included, formulate with hard water in mind. Chelators are built into the base to bind up minerals like calcium and iron so they do not interfere with the lather. In plain terms, our soaps are designed to handle whatever water comes out of your tap.
The Step-by-Step Lathering Process
This is where things start to come together. Artisan shaving soap rewards good technique. Rushing it or guessing your way through will almost always backfire. Take a few minutes to get this part right and the rest will follow.
Step 1 – Prep Your Gear and Skin
-
Soak the brush: If you are using a boar or badger brush, let it soak in warm water for a few minutes. This softens the bristles and helps them hold water. Synthetics do not need pre-soaking. Just wet and go.
-
Hydrate the skin: A shower does the trick here. The goal is hydration. Hair needs water to soften. Dry hair resists cutting and pulls more under the blade. The keratin in hair swells and softens with heat and moisture, which makes shaving easier and more comfortable. That is why a shower is generally considered necessary prep, no matter how or where you shave.
-
Optional bloom: For harder milled soaps, add a few drops of warm water to the top of the puck and let it sit while the brush soaks. This softens the surface and makes loading easier. Some people pour it off. Some use it as a pre-shave splash. Either way works.
An important note for those using artisan soaps. Blooming is generally unnecessary and counterproductive. These formulas are already soft enough to load easily without added water. Introducing extra moisture can waste product and may disrupt the soap’s internal pH, increasing the risk of microbial growth over time.
Step 2 – Load the Brush
-
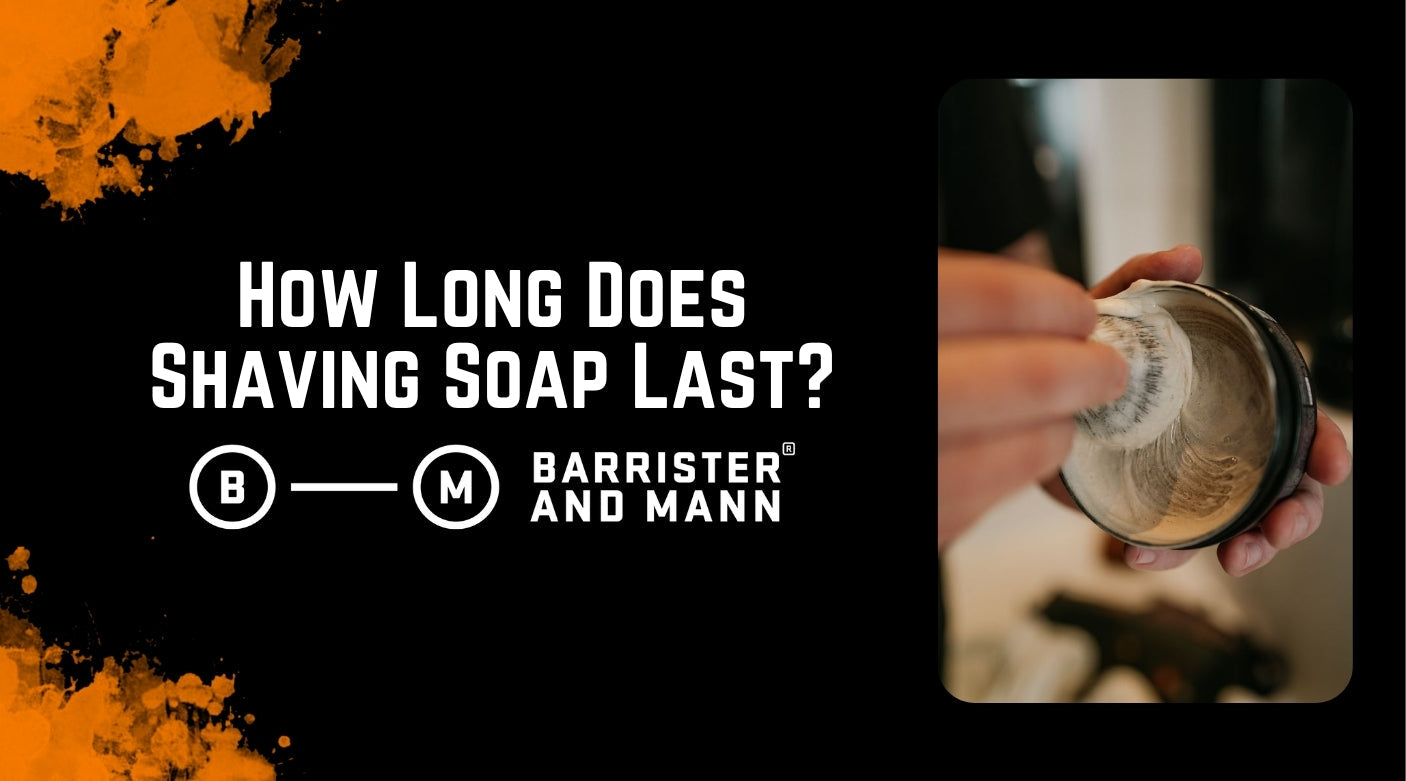
Load the brush, not the bowl: Swirl directly on the soap with firm, even pressure. You are not building lather here. You are packing soap into the tips of the bristles.
-
Give it time: Start with 30 seconds. You want the brush to look like it is coated in paste, not foam. If it starts to bubble like shampoo, either keep loading with more product or rinse it out and try again.
-
Adjust based on soap type: Hard soaps take more time and more pressure to load effectively. The goal is to build up a dense, paste-like consistency on the brush. The soap will hold its shape just fine. You are watching the brush, not the puck.
Step 3 – Build the Lather
-
Pick your canvas: You can lather on your face, your legs, your head, your palm, or in a bowl. Bowls give you the most control over water ratio and texture. Face or body lathering gives you more direct feedback from your skin. Both approaches work. Choose the one that suits the job and your preferences.
-
Add water in drops, not splashes: Drip water from your fingers into the brush or use a wet brush tip to incorporate it slowly. Swirl, whip, and watch it change. You want gloss and density, not bubbles. Remember, it should resemble a luscious Greek yogurt, not a foam party.
Just a note for those using our soaps. They tend to need a bit more water than most, so do not be shy. Add it slowly and watch the texture. When it turns glossy and slick, you are there. -
Know when to stop: If the lather runs down the handle, it is too wet. If it sticks in clumps, it is too dry. The sweet spot is creamy, even, and slick to the touch. When it feels like Greek yogurt, you are there.
Applying Lather to Any Area
Not everyone is shaving their face. Legs, heads, and underarms. Anywhere that you have unwanted hair is fair game. The lather does not care what surface you apply it to. But how you apply it will change depending on the terrain.
-
Face: Start with circular motions to exfoliate and raise the hair. Follow with painting strokes to smooth and even the layer. Take your time. It makes a difference.
-
Legs: Use longer, controlled strokes. Scrub gently to get under the hair, then paint it smooth. If the lather feels sticky or starts to tug, add a bit more water.
-
Underarms: Use a lighter touch. The skin is thinner and more sensitive. You may want to build the lather in your palm first, then apply with painting motions only.
-
Head: Exfoliate in circles like you would on the face, but be extra careful around swirls or scars. Keep your water ratio tight. If the lather starts to run, you may have gone too far—though high-hydration lathers are often preferred by straight razor users for their slickness. They sacrifice cushion, but depending on your tools and needs, that tradeoff might be exactly right.
Raise the Hair, Ready the Skin
Working the brush in gentle, circular motions does more than just spread the lather: it also helps lift the hair and clear away dead skin, setting up a cleaner path for the razor and improving the overall result.
Hydration plays a big role too. A well-hydrated lather keeps the skin soft and the follicles open. That is how you avoid drag, nicks, and the red patches that show up ten minutes after you rinse off.
Troubleshooting Common Lathering Issues
Even with good soap and the right tools, things don't work as intended. Most lathering problems come down to water, product, or speed. Here is how to fix the big ones.
Thin or Foamy Lather
If your lather looks airy, breaks down fast, or barely coats the skin, chances are you did not load enough soap or added water too quickly. Air gets trapped in the mix and the structure collapses. This kind of lather offers almost no protection.
To fix it, start over with a more generous load. Give it a full 30 seconds or more and add water in slow drips, not all at once. Watch the texture as you go. You are looking for density and gloss, not volume.
Brush Goes Dry Mid-Shave
If your brush starts to feel stiff or scratchy halfway through, it is probably too dry. This can happen if you did not soak it enough at the start, especially with animal hair, or if your lather was underhydrated from the beginning.
The fix is simple. Dip just the tips of the brush into warm water and go back to the area you are shaving. You do not need more soap. You just need to rehydrate what is already there.
Irritation or Poor Glide
If the blade feels like it is dragging or catching instead of gliding, the lather is not slick enough. That usually means it is too dry or underdeveloped. This is one of the most common causes of post-shave redness.
To fix it, revisit your water ratio. Go back to the bowl or your palm and work more hydration into the lather. Test it between your fingers. If it feels tacky or fluffy, it is not ready. Keep swirling until it feels slippery and smooth.
How Long Should the Whole Process Take?
For first-timers, expect the lathering process to take five to seven minutes. You are learning how your brush, your soap, and your water all interact. That takes a minute. You are allowed to take your time.
With a bit of repetition, that drops to two or three minutes. Loading, building, and applying become second nature.
It’s Not Just Lather—It’s Ritual
Shaving lather is not just a means to an end. It is part of the experience. The brush in your hand. The scent rising from the bowl. The way the lather builds and shifts as you work it. This is tactile. Fragrant. Intentional.
When the lather is right, the shave becomes smooth, quiet, efficient. The razor glides. The skin feels clean, not stripped. It is one of the few rituals left that asks you to slow down and pay attention. And when you do, everything gets better.
Looking to elevate your entire shaving experience? We make soaps that were built for exactly this.
-
Seville – Our best-selling shaving soap, affectionately dubbed “God’s barbershop,” delivers elite performance and a scent you’ll actually look forward to.
-
Cheshire – My personal favorite. A blend of American clary sage, bergamot, and small amounts of lavender and patchouli creates a very realistic interpretation of the smell of Earl Grey tea.
-
Soap Samples – Unsure which one of our scents would work best for you? Grab a few sample bars to find your perfect match.